
Install AgroPOS
AgroPOS runs on Windows. You need the computer on which the shop will actually bill customers — the licence locks to that machine.
Windows 10 or 11
64-bit. Windows 8 and older are not supported.
4 GB RAM, 2 GB free
Any computer bought in the last eight years is enough.
Internet once
Needed only to activate. Daily billing works fully offline.
-
Download the installer
Sign in at agropos.innobrains.pk and open Downloads. If you have not bought yet, you can still install and use the 14-day trial.
-
Run
AgroPOS-Setup.exeWindows may show a blue “Windows protected your PC” box because the file is newly published. Click More info, then Run anyway. This is normal.
-
Accept the default install folder
Keep the folder the installer suggests unless you have a reason to change it. Leave Create a desktop shortcut ticked.
-
Launch it
Open AgroPOS from the desktop shortcut. The activation screen appears first.
Activate, or start the free trial
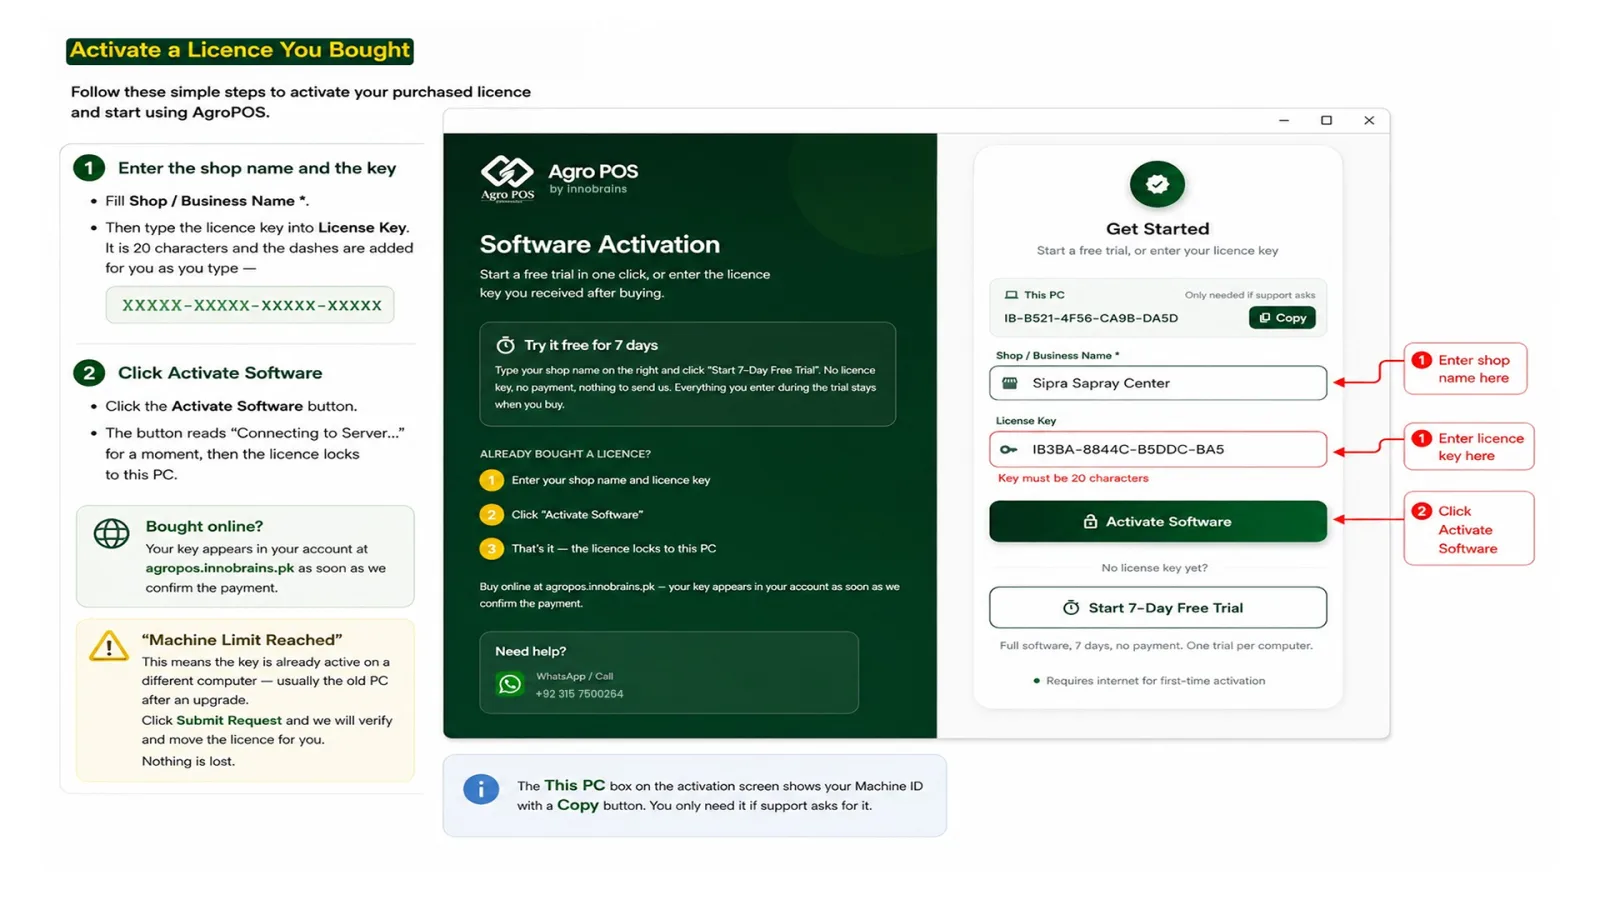
The first screen is Software Activation. You have two ways forward, and both need internet for this one step only.
Option A — 14-day free trial
-
Type your shop name
Fill Shop / Business Name * — for example Ali Agro Store. This is the name that will print on every invoice, so enter it the way you want customers to see it.
-
Leave the licence key box empty
The License Key field says “Leave empty if you are starting a free trial”. Skip it.
-
Click Start 14-Day Free Trial
You get the complete software for 14 days — every feature, no limits, nothing to pay.
The trial is tied to this machine. Reinstalling Windows or re-installing AgroPOS will not give a second trial. Everything you enter during the trial — products, customers, sales — stays when you buy the licence.
Option B — activate a licence you bought
-
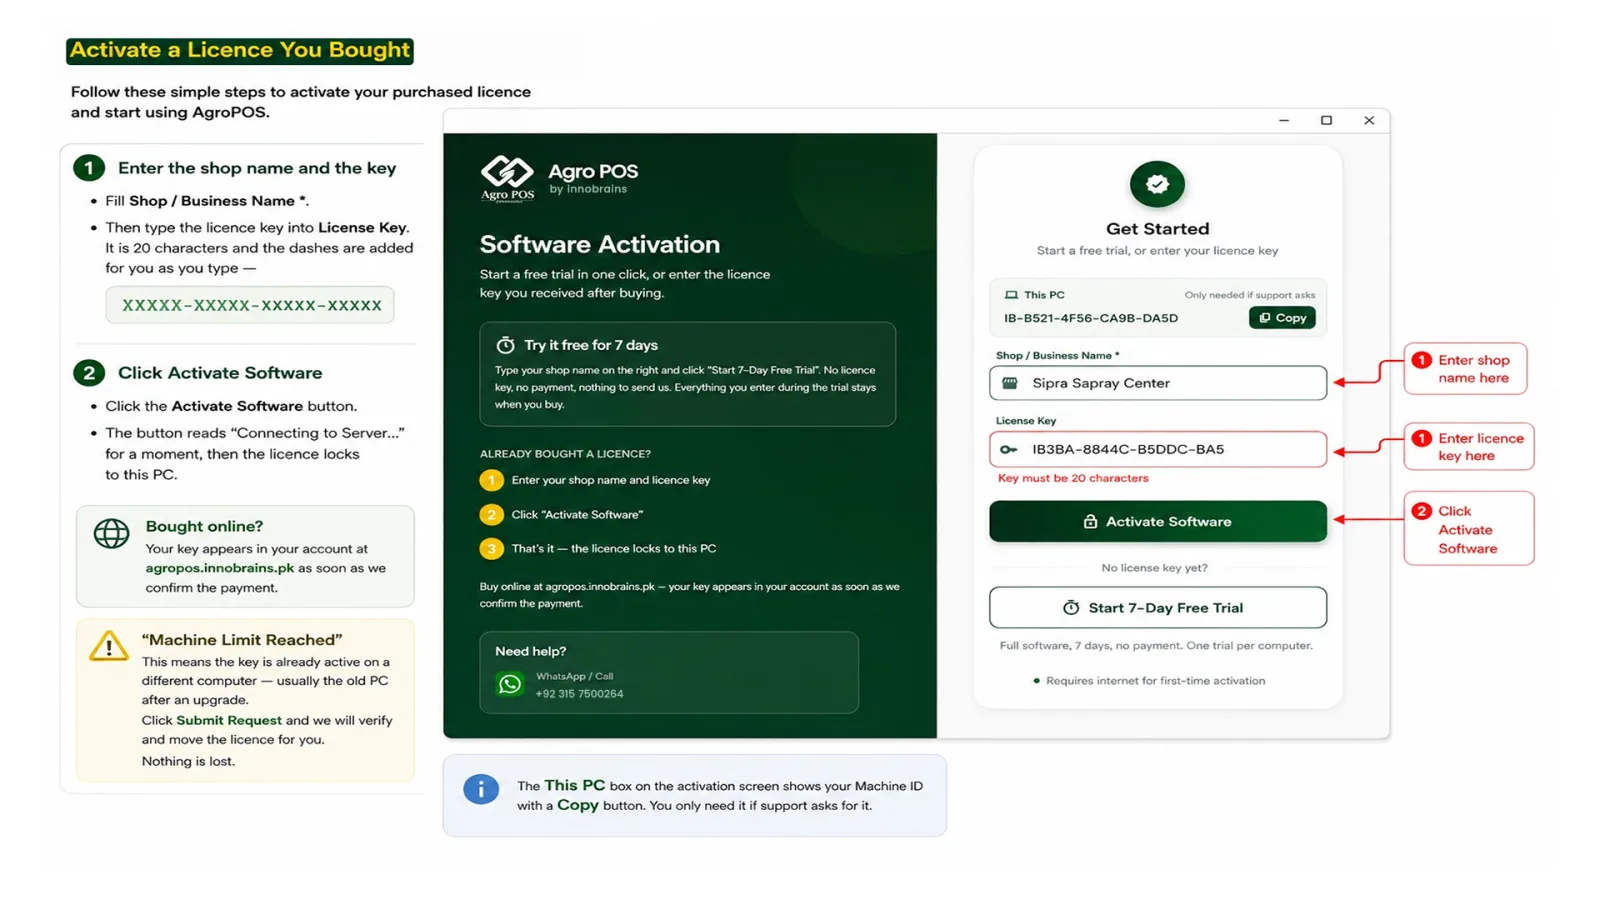
Enter the shop name and the key
Fill Shop / Business Name *, then type the licence key into License Key. It is 20 characters and the dashes are added for you as you type —
XXXXX-XXXXX-XXXXX-XXXXX. -
Click Activate Software
The button reads “Connecting to Server…” for a moment, then the licence locks to this PC.
Bought online? Your key appears in your account at agropos.innobrains.pk as soon as we confirm the payment.
This means the key is already active on a different computer — usually the old PC after an upgrade. Click Submit Request and we will verify and move the licence for you. Nothing is lost.
The This PC box on the activation screen shows your Machine ID with a Copy button. You only need it if support asks for it.
First sign-in
After activation you land on the login screen. AgroPOS ships with one built-in administrator account.
| Field | Value |
|---|---|
| Username | admin |
| Password | admin123 |
Anyone who clicks Forgot Password? on the login screen is shown admin123 in plain text. Until you change it, any person who can reach the keyboard can sign in as the administrator. Go to Users, open your own row and use Change Password.
If you are ever locked out completely, the login screen has Still can't login? → Emergency Reset via Support. It shows a reset code that is valid only for that day; call us on +92-315-7500264 and we will read back an unlock code.
Enter your shop details
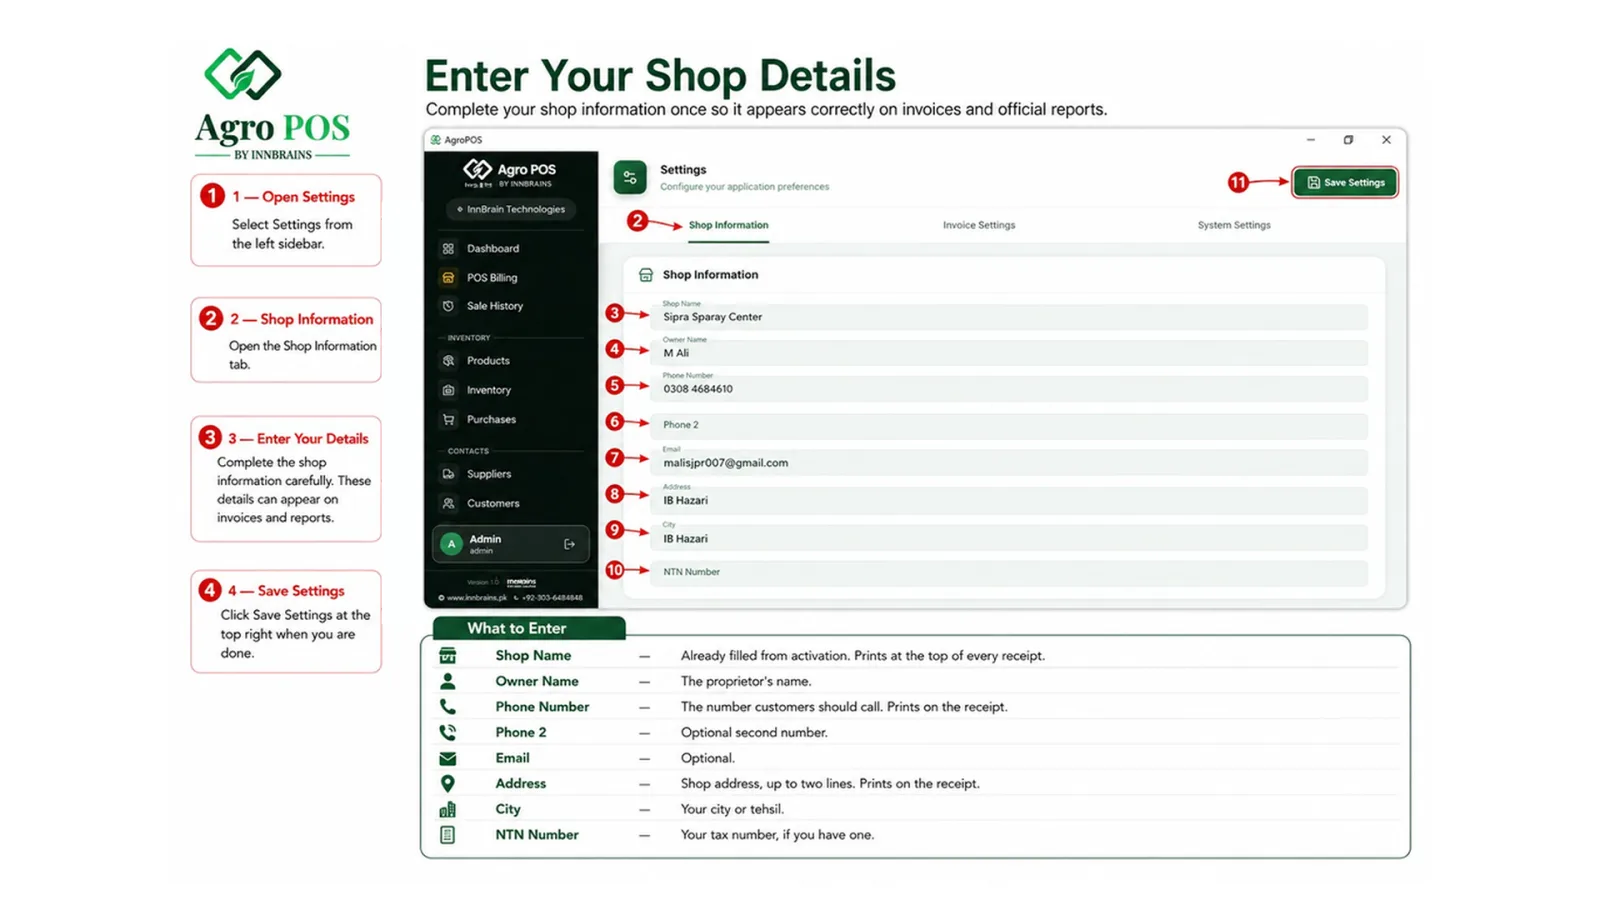
These details print on every invoice and on every official report, so fill them once and carefully. Open Settings from the sidebar, tab Shop Information.
| Field | What to enter |
|---|---|
| Shop Name | Already filled from activation. Prints at the top of every receipt. |
| Owner Name | The proprietor's name. |
| Phone Number | The number customers should call. Prints on the receipt. |
| Phone 2 | Optional second number. |
| Optional. | |
| Address | Shop address, up to two lines. Prints on the receipt. |
| City | Your city or tehsil. |
| NTN Number | Your tax number, if you have one. |
Click Save Settings at the top right when you are done.
Invoice numbers and tax
Settings → Invoice Settings controls how your bills are numbered and what appears on them.
Numbering
Invoice Prefix is the letters in front of the number — INV, SALE or your own. Starting / Next Invoice Number is the number the next sale will take. A live preview shows exactly what the next invoice will look like, for example INV-00001.
If your last handwritten bill was 1,240, set the starting number to 1241. Your numbering carries on without a break.
Tax and currency
Tax % (0 for no tax) — leave it at 0 if you do not charge GST; the tax line then stays off the receipt. Currency Symbol defaults to Rs.
The Invoice Footer Text field is fixed and cannot be edited — that is why it shows a lock icon.
Stock alerts
Under System Settings: Low Stock Alert Threshold (default 10) warns you when an item runs low, and Expiry Alert Days (default 30) warns you a month before a batch expires. Both appear on the Dashboard.
Connect the printer
AgroPOS prints an 80 mm thermal receipt and a full A4 invoice. You can use either, or both.
-
Plug the printer in and install its Windows driver
Use the CD or the driver from the printer maker's website. Windows must see the printer before AgroPOS can.
-
Open Settings → Invoice Settings → Printer Settings
Pick your printer from the Thermal Printer list. If it is not there, click the refresh icon (Rescan for printers).
-
Save
This just remembers your choice. The Windows print dialog still opens each time so you can confirm before printing.
Windows itself cannot see the printer. Check the USB cable, switch the printer on, and reinstall its driver — then click Rescan for printers.
No printer at all? You can still run the shop. After each sale use Share Invoice PDF to send the bill to the customer on WhatsApp.
Add your products and stock
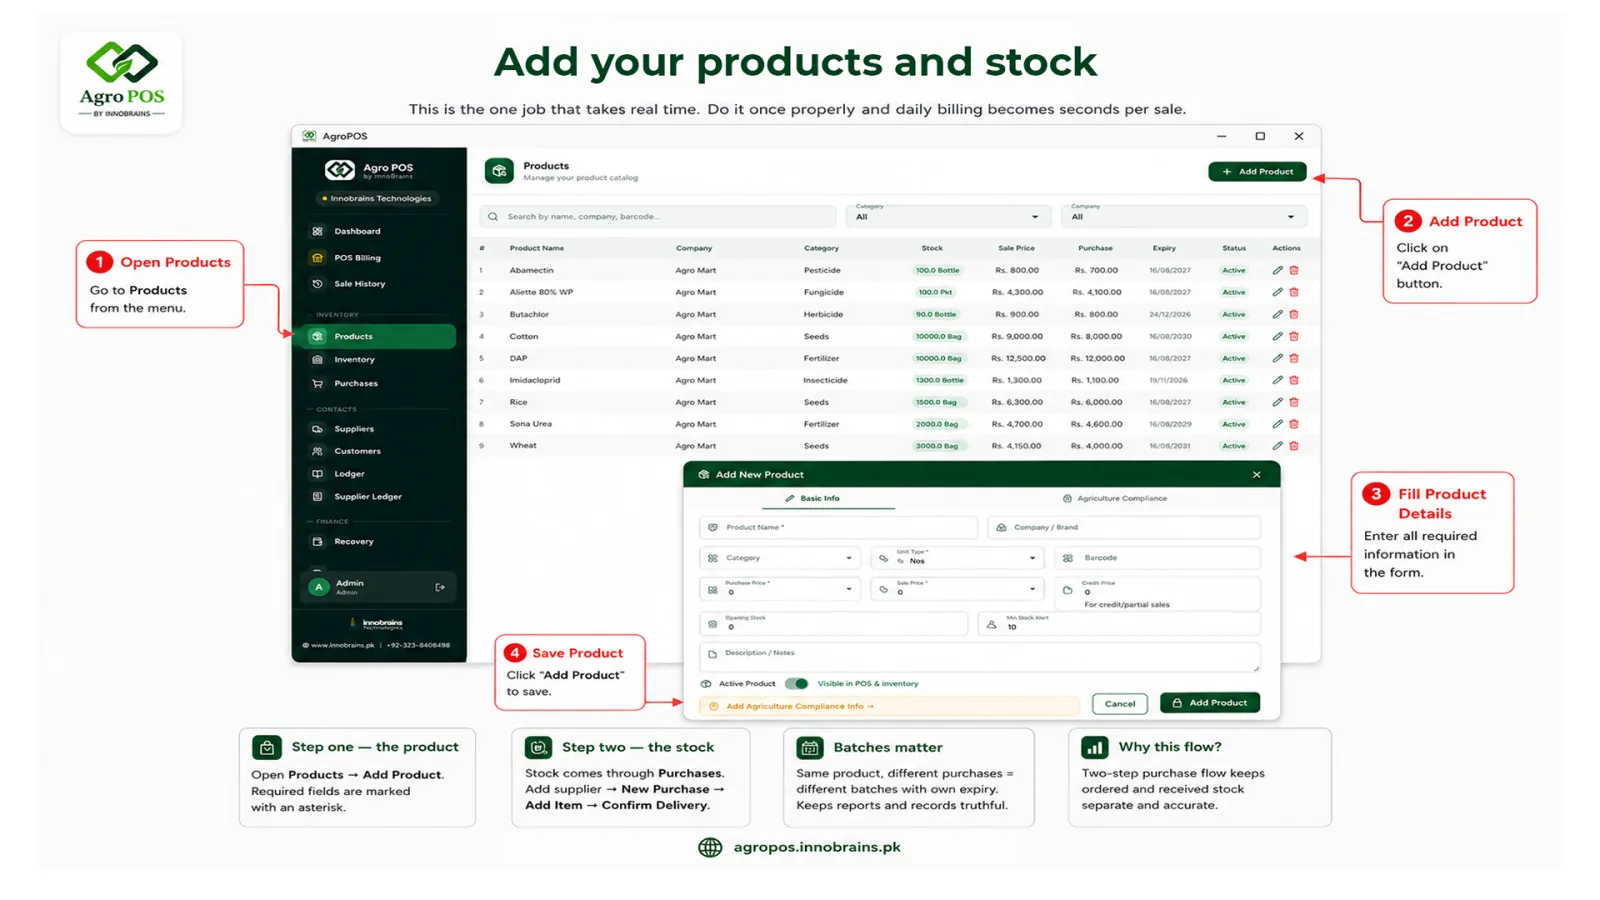
This is the one job that takes real time. Do it once properly and daily billing becomes seconds per sale.
Step one — the product
Open Products → Add Product. Required fields are marked with an asterisk:
| Field | Notes |
|---|---|
| Product Name * | The name your staff will search for. |
| Company / Brand | Manufacturer — useful for company-wise stock reports. |
| Category | Pesticide, fertiliser, seed, and so on. |
| Unit Type * | Bottle, bag, kg, litre — how you sell it. |
| Barcode | Scan the pack here and the scanner will find it instantly at the counter. |
| Purchase Price * | What you pay the supplier. Drives your profit reports. |
| Sale Price * | Your cash price. |
| Credit Price | Your udhaar price, if it is higher. AgroPOS switches automatically by sale type. |
| Min Stock Alert | Overrides the global low-stock number for this one item. |
Step two — the stock
Adding a product does not add stock. Stock arrives through Purchases, which is what keeps your batch and expiry records correct:
-
Add the supplier
Suppliers → add the company, contact and any opening balance you already owe them.
-
Raise the purchase
Purchases → New Purchase. Choose the supplier, enter their bill number and date, then Add Item for each product with its batch and expiry date.
-
Confirm delivery
Click Deliver → Confirm Delivery. Only now does the stock enter your inventory. This two-step design means goods you have ordered but not received never inflate your stock.
That figure records what you have, but it does not create a batch — and the counter sells from batches. So the product can read “25 in stock” while every attempt to bill it answers “out of stock”.
Open Pending Stock in the sidebar. Every product in that state is listed there, and the Complete Purchase button opens the ordinary purchase form with the product and quantity already filled in. Choose the supplier and Cash / Credit / Partial as you would on any purchase, and the stock becomes sellable.
The quantity shown is for purchasing the item, not a count of your shelf. If part of it was already sold by hand while the till refused to bill it, enter what you actually bought, then correct the shelf figure from Inventory.
The same product bought twice at different times is kept as two batches with their own expiry dates. At the counter the cashier picks the batch, so your expiry reports and Agriculture Department records stay truthful.
Add your staff
Give every person their own login. Then the sale history tells you who sold what, and you decide who is allowed to discount, delete or restore.
Open Users → Add User, and fill Full Name *, Username *, Password * and Role *. There are three roles:
| What they can do | Cashier | Store Manager | Admin |
|---|---|---|---|
| Bill a sale, take payment | Yes | Yes | Yes |
| See sale history, do a return | Yes | Yes | Yes |
| Add customers, collect udhaar | Yes | Yes | Yes |
| Give a discount | No | Yes | Yes |
| Cancel a completed sale | No | Yes | Yes |
| Manage products & purchases | No | Yes | Yes |
| Adjust stock | No | Yes | Yes |
| See Reports & Inspector Mode | No | Yes | Yes |
| Create a backup | No | Yes | Yes |
| Restore a backup | No | No | Yes |
| Change Settings | No | No | Yes |
| Manage users | No | No | Yes |
Menu items a person cannot use are hidden from their sidebar completely, so nobody has to learn which buttons to avoid.
The owner is the Admin. Whoever runs the shop day to day is a Store Manager. Everyone on the counter is a Cashier. Restoring a backup replaces all data, which is why it is kept to the Admin alone.
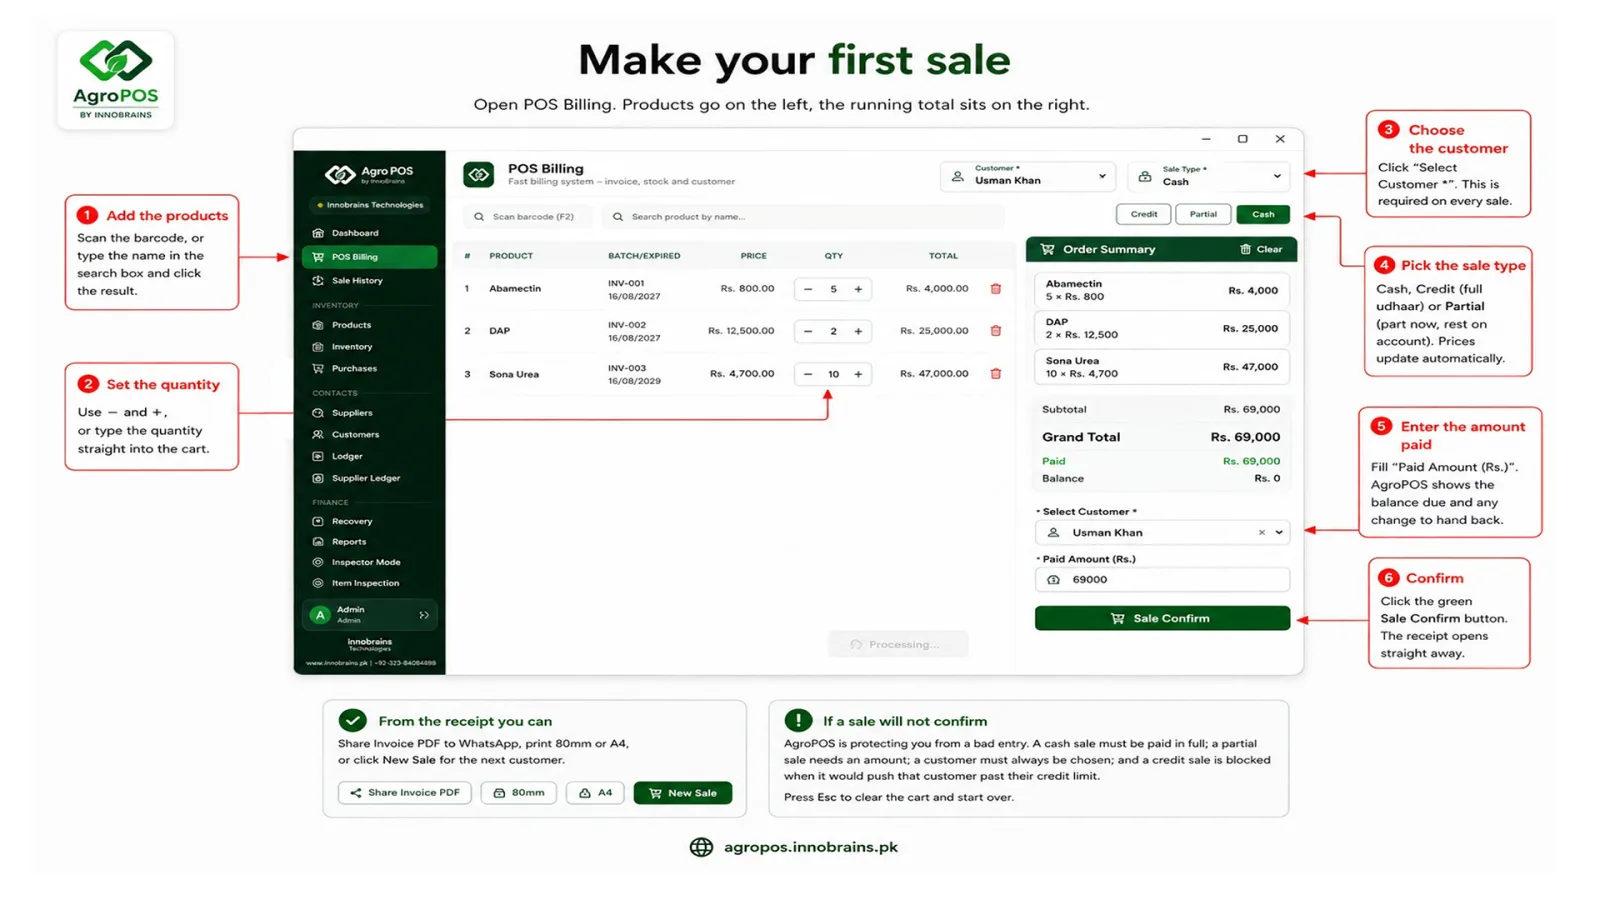
Make your first sale
Open POS Billing. Products go on the left, the running total sits on the right.
-
Add the products
Scan the barcode, or type the name in the search box and click the result. If the product has more than one batch in stock, pick the right pack size and expiry from the list that appears.
-
Set the quantity
Use − and +, or type the quantity straight into the cart. The price is editable too. Going over available stock is blocked and the row tells you how much is left.
-
Choose the customer
Click Select Customer *. This is required on every sale. If they are new, click New Customer, enter at least the name, and save.
-
Pick the sale type
Cash, Credit (full udhaar) or Partial (part now, rest on account). Prices update automatically, because credit prices can differ from cash prices.
-
Enter the amount paid
Fill Paid Amount (Rs.). AgroPOS shows the balance due and any change to hand back.
-
Confirm
Click the green Sale Confirm button. The receipt opens straight away.
From the receipt you can Share Invoice PDF to WhatsApp, print 80mm or A4, or click New Sale for the next customer.
AgroPOS is protecting you from a bad entry. A cash sale must be paid in full; a partial sale needs an amount; a credit or partial sale needs a customer, because money owed has to be owed by somebody; and a credit sale is blocked when it would push that customer past their credit limit.
Press Esc to clear the cart and start over.
Selling to a walk-in customer
A cash sale can be completed without choosing anybody. Press Cash and the confirm button reads Walk-in Sale. Nothing is owed, so there is no ledger to write and no name to attach — and your customer list stays free of people who bought once.
You can still add a customer to a cash sale whenever you want the purchase on their record.
Entering sales from before you started
Most shops come to AgroPOS part-way through a season with weeks of trading already done. Those bills can be entered on the days they actually happened, so your reports read correctly from the start.
Under the Cash / Credit / Partial buttons there is a line showing today's date and a Change date link. Pick the day the sale happened and the till turns amber, reading Old sale with the date — deliberately hard to miss. Confirm the bill as normal. The till returns to today by itself, so the next customer is never dated by accident.
A back-dated bill is a complete sale: stock comes off, the batch and expiry are recorded, and a credit balance goes onto the customer's ledger. Only the date differs.
Old sales take stock off just like new ones. If you enter today's shelf count first and then add three weeks of past sales, the software will end up below what is actually on your shelf. Enter the old sales first, then count the shelf and correct anything that does not match.
The same applies to udhaar. If a customer's opening balance already includes the bills you are about to enter, that money will be counted twice. Either set opening balances to cover only the period before the sales you are entering, or check each balance once you have finished.
Udhaar and recovery
Credit is how an agriculture shop actually runs. AgroPOS is built around it rather than treating it as an exception.
Credit limit per customer
Set a limit when you add a customer. AgroPOS refuses a credit sale that would cross it and tells the cashier by exactly how much.
Customer Ledger
Open Ledger to see one customer's full history — every sale, every payment, the running balance.
Recovery
Open Recovery, pick the customer and click Collect Payment. The top strip shows total pending, how many customers owe, and what you recovered today and this month.
Payment date at the counter
On a Credit or Partial sale, tell AgroPOS when the customer says they will pay — Tomorrow, 1 week, or any date you pick. It is optional: leave it blank when no date was named. The date then appears on Recovery Dates on the day, green while it still stands and red once it has passed.
Settling a khata short
A customer owes Rs 51,000 and settles at Rs 50,000? Take the payment in Recovery and tick Settle the account. The khata closes at zero and the forgiven Rs 1,000 is recorded as a Write-off expense against that customer, so it comes out of your profit instead of quietly inflating it. Admin only.
Returns
From Sale History, return items either against the customer's balance or as a cash refund, and mark the goods as good stock or damaged.
Close the day
Every evening, count the cash in the drawer and check it against what the software expects. This is how a shortage is found on the day it happens, not a month later.
How the money was paid
When you take money at the counter, choose how it arrived — Cash, Easypaisa, JazzCash, Bank Transfer, Cheque or Other. The same choice appears when you take a recovery payment.
Only cash goes into the drawer. If a customer pays Rs 40,000 by Easypaisa and the software counted it as cash, every evening would show Rs 40,000 missing. Recording the method is what makes the day close trustworthy.
The question is only asked when money is actually being paid. A full udhaar sale is not asked, because nothing has been paid yet.
Counting the drawer
-
Set the opening cash
Open Day Book and enter the notes that were in the drawer when the shop opened. The next day this carries forward on its own; change it only if you took cash home overnight.
-
Record anything taken to the bank
If cash left the drawer for the bank during the day, enter it under Cash to Bank so it is not expected in the count.
-
Count and close
Press Count and Close Day, count the notes, and enter the total. The software then tells you whether it matches, and by how much it is short or over.
It is shown only after you enter your total, and only if you ask for it. Seeing the answer first turns a count into a copy, and then a real shortage is never noticed.
If the cash is short or over
Short usually means a payment was taken without a bill, or cash left the drawer without an expense entry. Over usually means a sale was billed as udhaar but actually paid, or an expense was entered twice. Write what you find in the note box — it stays with that day.
Credit sales are on the khata, not in the till, so they are left out of the cash figure. The day’s full takings are shown separately, so you can still see everything you sold.
What counts as cash, and what does not
Only money that physically entered or left the drawer is counted. Three things look like cash and are not:
- A payment to a supplier sent by bank transfer, Easypaisa or cheque. When you record the payment, choose how it was sent — if it is marked cash, the day close expects notes that were never in the drawer and reports a shortage.
- Settling a khata short. The forgiven amount is a real cost and appears in the profit statement, but the customer never handed it over, so it is not taken out of the drawer.
- The opening balance of expenses from before AgroPOS. It is history, not a payment made today.
Until v1.0.52 the profit statement counted cancelled bills as if they were sales. Cancelling a bill always put the stock and the khata back correctly, but the revenue and cost stayed in the report. They are now excluded, so the figure you see is lower — and correct. The sales register always excluded them, which is why the two reports used to disagree.
Who can close the day
A Store Manager or Admin. A cashier hands over the notes; the person who signs the day off is the one answerable for a shortfall.
Back up your data
Your whole business lives in one database file on this computer. Backups are what stand between a failed hard disk and starting from zero.
Cloud backup — automatic
With an active licence, AgroPOS uploads an encrypted backup to our server on its own, roughly once an hour whenever the computer is online. Backup & Restore → Cloud Backup shows the status and the time of the last upload. You can also press Backup Now whenever you want.
If the PC is replaced or Windows is reinstalled, activate the same licence key on the new machine and every cloud backup is still there, ready to restore. Backups made on a different device are labelled so you always know what you are restoring.
Local backup — your own copy
Click Create Backup Now on the Local Backup tab. The file is saved to Documents\AgriPOS_Backups. Copy those files to a USB stick from time to time — a backup that lives only on the same disk as the original does not protect you from that disk failing.
Restoring
Find the backup in the list and click Restore, or use Browse & Restore for a file you copied from elsewhere.
All current data is overwritten by the backup, and it cannot be undone. Make a fresh backup before restoring an old one. This is why only an Admin is allowed to do it.
Recommended routine: leave cloud backup running, create a local backup at the end of each week, and copy those to a USB stick once a month.
Moving to AgroPOS Multi-Counter
If you outgrow one till and buy the Multi-Counter licence, you take your whole shop with you — products, stock, customer khata, bills, suppliers, day book, everything. Multi-Counter is a separate program with its own data folder, so it starts empty until you bring your data across. That is what the backup you already make is for.
- On your current AgroPOS, open Backup & Restore → Local Backup and click Create Backup Now. Do this when the shop is closed, so nothing is half-written.
- Install AgroPOS Multi-Counter on the computer that will be the main counter — the one that holds the data and stays on while the shop is open.
- Activate it with your Multi-Counter licence key.
- Open Backup & Restore → Browse & Restore and choose the backup file from step 1. It is in
Documents\AgriPOS_Backups. - Your shop is back. Check the stock count and one customer's khata before you carry on.
- Only then set up the other counters, and point them at the main counter over your shop network.
Both programs keep working and each keeps its own separate records. A bill made on the old one after the move will not appear on Multi-Counter, its stock will not come off, and nobody will notice until the godown count does not match. Close it, and keep it only as a fallback until you are satisfied the new one is running.
Multi-Counter is a separate licence, so your single-counter key is not consumed or changed by the move. If you ever want to go back, the old program and its own data are still on the computer exactly as you left them.
Inspector Mode
When an Agriculture Department inspector visits, you should not be assembling paperwork. Open Inspector Mode, choose the date range, and click the report you need — it generates as a PDF ready to print.
Current Stock Report
Everything you hold right now.
Batch-wise Stock Report
Stock split by batch number.
Expiry Report
What is expiring, and what has expired.
Sales Register
Every sale in the chosen dates.
Purchase Register
Every purchase in the chosen dates.
Company-wise Stock
Holdings grouped by manufacturer.
Daily Sales Report
A single day, in detail.
These reports follow Punjab Agriculture Department inspection requirements. Inspector Mode is available to Store Managers and Admins.
Common problems
| What you see | What to do |
|---|---|
| “Invalid license key” | Check for a typo — the key is 20 characters and the dashes are added for you. Copy and paste it from your account page if you can. |
| “No internet connection” | Activation and cloud backup need internet; daily billing does not. Connect and try again. |
| “Machine Limit Reached” | The key is active on another PC. Click Submit Request and we will transfer it. |
| “The free trial has already been used on this computer” | One trial per machine, and it cannot be reset. Buy a licence to carry on — your trial data stays. |
| Trial banner counting down | Normal. Click Buy licence, or purchase at agropos.innobrains.pk and activate the key. |
| Forgot the admin password | Forgot Password? shows the default. If it was changed, use Emergency Reset via Support and call us with the code on screen. |
| “No printers detected” | Windows cannot see the printer. Check the cable and power, reinstall the driver, then Rescan for printers. |
| A menu item is missing | Your role does not include it. An Admin can change your role under Users. |
| “Only an Admin can restore a backup” | Correct — restoring wipes all current data, so it is limited to the Admin account. |
| Sale will not confirm | A customer must be selected; a cash sale must be fully paid; a credit sale must stay inside the customer's credit limit. |
| Product will not add to the bill | It is out of stock, or all its batches are used up. Receive it through Purchases first. If the product shows stock but still will not bill, the quantity was typed in when the product was created and never purchased — open Pending Stock and complete the purchase from there. |
| Windows blocks the installer | Click More info → Run anyway. It appears because the build is newly published. |
Get help
Talk to a person. We build AgroPOS ourselves, so the people who answer are the people who wrote it.
Before you call
Have your Machine ID ready — it is on the activation screen, with a Copy button.
This guide covers AgroPOS v1.0.53. Screens may differ slightly on newer builds.